If you’re locked out of your iPhone, you’re not alone. It happens after too many wrong passcode tries, when you inherit a phone from a family member, or when you just can’t remember the code you set last week. The good news: there are safe, Apple-approved ways to get back in. The trade-off is that real solutions usually involve erasing the device first and then restoring your data from a backup. In this guide, we’ll walk through every legitimate path—step by step—so you know exactly what to do, what you’ll need, and how to protect your data for next time.
Quick answer: To unlock an iPhone without a password, you’ll need to erase it and restore from a backup. Use iCloud (Find My) to erase remotely, or put the iPhone in Recovery Mode with a Mac/PC and restore with Finder/iTunes. After the erase, you must sign in with the Apple ID that was previously used on the phone (Activation Lock). If you don’t know the Apple ID or can’t access it, contact Apple Support with proof of purchase.
Key Takeaways
- Find My = easiest remote unlock: If Find My iPhone was turned on, you can erase the device from iCloud.com (or the Find My app). This removes the passcode; during setup you must sign in with the same Apple ID and then restore your backup.
- No Find My? Use a computer: Without Find My, put the iPhone in Recovery Mode (or DFU if needed) and restore with Finder (Mac) or iTunes (Windows). This erases the phone, then you sign in with the original Apple ID to pass Activation Lock and restore data if you have a backup.
- No true bypass exists: There’s no way to unlock a passcode without erasing first. Even Apple won’t bypass your passcode; they’ll only help after you provide proof of ownership. Expect data loss if you don’t have a backup.
- No computer? Use “Erase iPhone” on the lock screen: On newer iOS versions, after several failed attempts you’ll see Erase iPhone on the lock screen. Use it to wipe the device with your Apple ID credentials, then set it up again and restore from iCloud if available.
- Bought used and it’s still tied to someone else? You can’t complete setup if Activation Lock is on. The previous owner must remove the device from their iCloud account (or you’ll need original proof of purchase for Apple to review).
Why you can’t “bypass” an iPhone lock (and why that’s good)
Apple builds iPhones to keep your data safe. That means there isn’t a secret “back door” to skip a passcode, Face ID, or Touch ID. If there were, thieves could use it too. So when you see tools claiming to “crack” any iPhone in minutes—be careful. Most are scams, risky, or break the law. The only reliable, legal methods are the ones Apple gives you: erase the phone, then sign in with the correct Apple ID to prove ownership, and finally restore your backup.
This guide focuses on owner-authorized recovery. If the phone isn’t yours (or you don’t have permission), stop here.
📖 Also Read: Simple Ways To Activate A New Phone Without A SIM Card
Read this first: what you’ll need
Before you begin, gather the basics:
- Apple ID & password for the device. You’ll need this after erasing to pass Activation Lock.
- Two-factor authentication device or trusted number (if enabled on your Apple ID).
- A Mac or Windows PC with internet if using Recovery Mode.
- Mac: use Finder (macOS Catalina or later).
- Windows: install the latest iTunes.
- A Lightning/USB-C cable that works for data.
- A backup (iCloud or computer) if you want your photos, messages, and apps back.
No backup? You can still unlock the phone by erasing it, but you’ll be starting fresh.
Option 1: Erase and unlock with iCloud (Find My)
This is the easiest method if Find My was turned on and you remember your Apple ID.
What it does: Erases the iPhone remotely, removing the passcode. When you set it up again, you’ll sign in with the same Apple ID and restore from iCloud or a computer backup.
Steps:
- On another phone or computer, go to iCloud.com and sign in with your Apple ID.
- Open Find Devices (or Find My).
- Select your locked iPhone from the list.
- Choose Erase iPhone. Confirm.
- Wait for the erase to complete. (The iPhone needs to be online; if it’s offline, it will erase the next time it connects.)
- Turn on the iPhone and follow setup. When prompted, sign in with the same Apple ID and choose Restore from iCloud Backup or Restore from Mac/PC, if available.
When to use:
- You don’t have the computer you usually sync with.
- Find My was enabled.
- You know your Apple ID and password.
Option 2: Recovery Mode (Finder on Mac or iTunes on Windows)
Recovery Mode is the go-to method if Find My is off, you forgot your Apple ID password (but can recover it), or you simply prefer a direct restore using a computer.
What it does: Forces the iPhone into a special mode so Finder/iTunes can download the latest iOS and restore (erase + reinstall) the device.
What you’ll need:
- A Mac (Finder) or Windows PC (iTunes).
- A reliable internet connection (the restore downloads iOS).
- A compatible cable.
How to put the iPhone in Recovery Mode (by model):
- iPhone 8, X, SE (2nd/3rd gen), 11, 12, 13, 14, 15, 16 and newer:
- Turn the phone off.
- Press and hold the Side button while connecting the iPhone to the computer.
- Keep holding until you see the recovery mode screen (cable + computer icon).
- iPhone 7 / 7 Plus:
- Turn off.
- Hold Volume Down while connecting to the computer.
- Keep holding until the recovery mode screen appears.
- iPhone 6s or earlier (with Home button):
- Turn off.
- Hold Home while connecting to the computer.
- Keep holding until the recovery screen appears.
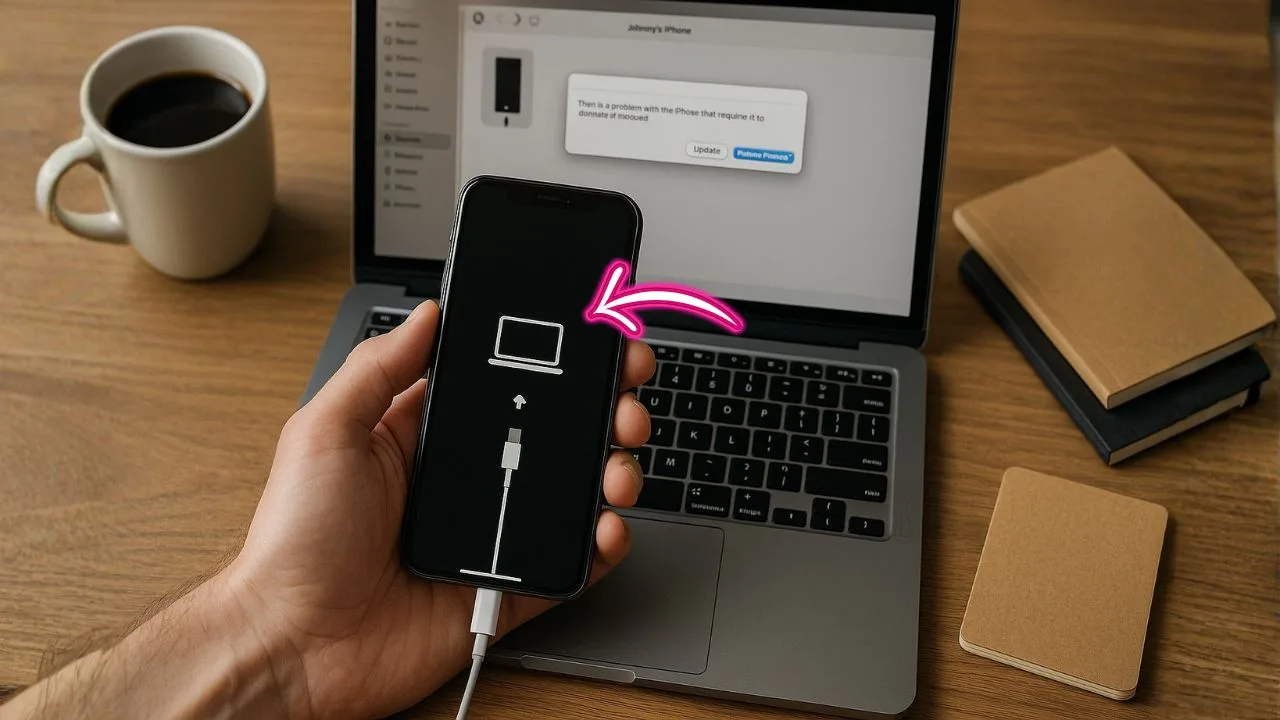
Restore in Finder/iTunes:
- Open Finder (Mac) or iTunes (Windows).
- You’ll see a message that there’s a problem with the iPhone and it needs to be Updated or Restored.
- Click Restore (this erases the device and installs the latest iOS).
- Wait for the process to finish. If it takes longer than 15 minutes and the phone exits recovery mode, repeat the steps.
- After restore, the iPhone restarts. Follow setup, sign in with the original Apple ID (Activation Lock), then restore your backup if you have one.
Common hiccups & fixes:
- Stuck on “preparing iPhone for restore”: Try a different USB port or cable, disable VPN or antivirus temporarily, and ensure iTunes/Finder is up to date.
- Error codes (4013, 4014, 9, etc.): Often cable or port related. Swap ports/cables, try another computer, and make sure the battery isn’t critically low.
- Download timeouts: Use a faster network, or download iOS again.
📖 Also Read: Can’t Find Your Assurance Wireless Activation PIN? Here’s What To Do
Option 3: DFU Mode (advanced, last resort)
Device Firmware Update (DFU) goes deeper than Recovery Mode. Use it if a standard restore fails or if you’re dealing with firmware glitches.
Caution: Timing is picky. If you miss it, try again slowly.
Generic DFU steps for Face ID models (timing may vary slightly by model):
- Connect iPhone to your computer. Open Finder/iTunes.
- Quickly press Volume Up, then press Volume Down.
- Hold the Side button until the screen goes black.
- As soon as it’s black, hold Side + Volume Down together for 5 seconds.
- Release Side but keep holding Volume Down for 10 more seconds.
- If the screen stays black and Finder/iTunes reports a device in recovery, you’re likely in DFU (not the standard recovery screen).
- Click Restore.
After the restore, proceed with setup, Activation Lock, and restoration from backup.
Option 4: Use Apple ID account recovery (if you forgot your Apple ID password)
If the roadblock is your Apple ID password, you can recover it:
- Go to iforgot.apple.com and follow the prompts.
- Approve on a trusted device or phone number, or answer security questions.
- Reset the password and try the iCloud or Recovery Mode steps again.
Tip: If you changed Apple IDs recently, remember that Activation Lock is tied to the Apple ID that was last used to sign into the device. You must use that exact account during setup after the erase.
Option 5: Get help from Apple (proof of purchase required)
When you can’t access the Apple ID and you’re the rightful owner, your best path is Apple Support:
- Gather proof of purchase (store receipt, carrier invoice showing the IMEI).
- Visit an Apple Store or authorized service provider, or start a support case online.
- Be ready to provide the IMEI/serial number from the original box or receipt.
Apple can review your documentation and tell you what’s possible. If everything checks out, they can help clear hurdles that standard steps can’t.
📖 Also Read: Airalo eSIM Not Activating In The USA? Carrier Compatibility & Fixes
What about carrier-locked iPhones?
Carrier lock and passcode lock are different things:
- Passcode/Face ID/Touch ID lock: Protects the device. You remove this by erasing and then signing in with the Apple ID (Activation Lock).
- Carrier lock: Ties the phone to one network. You remove this by meeting the carrier’s unlock policy (e.g., paid off, active for a certain time) and requesting an unlock.
You can complete a passcode unlock (erase + restore) and still be carrier-locked. If your goal is to use another SIM, also check your carrier’s unlock policy after you regain access.
Special cases and honest answers
“Can I unlock an iPhone without a password and without losing data?”
Not if the screen is locked and you can’t authenticate. Apple’s security model requires erasing the device to remove a forgotten passcode. Your best defense is having a recent backup so you can restore your data after the erase.
“Can I unlock without Apple ID?”
You can erase the device using Recovery Mode, but during setup, Activation Lock will ask for the Apple ID that was previously used on the phone. Without that, you won’t be able to finish setup—unless Apple clears it after verifying ownership.
“I bought a second-hand iPhone and it’s locked—now what?”
Ask the seller to:
- Remove the phone from their account at iCloud.com → Find My → remove the device.
- Provide proof of purchase and the last Apple ID email used on the device.
If the seller can’t or won’t help, treat it as a red flag. Apple will usually require proof of purchase linked to the phone’s serial/IMEI to help.
“What about Screen Time passcode?”
If Screen Time is restricting features and you don’t know that code:
- Go to Settings → Screen Time → Change Screen Time Passcode → Forgot Passcode?
- Sign in with the Apple ID used to set Screen Time to reset it.
If that doesn’t work and you’re truly locked down, a full erase+restore (with backup) will remove it, but you’ll still need the Activation Lock Apple ID after the erase.
Troubleshooting checklist (simple, clear, and in order)
- Check backups first. Open Settings on a different iOS device with your Apple ID → iCloud → iCloud Backup to confirm your last backup time. On a computer, check Finder/iTunes for device backups.
- Try iCloud erase (Find My). Fastest if enabled.
- Use Recovery Mode with a computer if Find My is off or fails.
- Use DFU Mode if Recovery Mode errors persist.
- Recover Apple ID at iforgot.apple.com if you don’t remember the password.
- Contact Apple with proof of purchase if Activation Lock blocks setup.
- Avoid third-party “unlock” tools that promise a magic bypass—they’re unreliable and risky.
Data recovery: what you can (and can’t) get back
- If you have an iCloud backup: During setup, choose Restore from iCloud Backup. You’ll get most of your data back—photos (if not using iCloud Photos, they’re only in the backup), messages, app data, and settings.
- If you have a computer backup: Choose Restore from Mac or PC. Encrypted backups restore Health data, Wi-Fi passwords, and website history; unencrypted backups don’t.
- If you use iCloud Photos: Your full-res photos sync back after you sign in and connect to Wi-Fi.
- If you had no backup: Apps can be re-downloaded, but local photos, messages, and app data that weren’t synced to iCloud are gone.
Keep this from happening again (a simple prevention plan)
Set this up once; thank yourself later.
- Turn on iCloud Backup: Settings → [your name] → iCloud → iCloud Backup → On. Plug in and connect to Wi-Fi regularly.
- Use iCloud Photos or another cloud photo service so your pictures live beyond your device.
- Write down your Apple ID (email) and keep your password in a trusted password manager.
- Add multiple trusted factors: enable two-factor authentication, add a trusted phone number, and keep recovery keys if you use them.
- Create a computer backup monthly (encrypted) if you have important data that can’t be lost.
- Update iOS to the latest version for security fixes and reliability.
Myths vs. facts
- Myth: Siri can unlock a locked iPhone screen.
Fact: Siri can’t bypass the passcode on a locked device. - Myth: Airplane mode or pulling the SIM helps you skip the passcode.
Fact: Connectivity doesn’t change screen lock behavior. - Myth: Any paid “unlocker” app can remove Activation Lock.
Fact: Without the correct Apple ID or Apple’s help with proof, Activation Lock remains.
FAQs
Q: My iPhone says “iPhone Unavailable” or “Security Lockout.” What now?
A: That appears after too many wrong attempts. Use iCloud erase or Recovery Mode to restore, then sign in with your Apple ID during setup.
Q: Can a repair shop unlock my iPhone without erasing?
A: A reputable shop will follow Apple’s rules. If they promise to “bypass” without erasing or Apple ID, be cautious.
Q: Do I need the SIM card to unlock the screen?
A: No. The lock screen is separate from the SIM. You can restore over Wi-Fi or a computer without a SIM.
Q: Will Activation Lock block me after I erase?
A: Yes, if the iPhone is tied to an Apple ID. You must sign in with that Apple ID or get help from Apple with proof of purchase.
Q: How long does a restore take?
A: It depends on your internet speed and the size of the iOS download (often several GB). Give yourself time, keep the cable connected, and don’t let the computer sleep.
Step-by-step summary (at a glance)
- Have Find My on? Erase via iCloud → set up → sign in with your Apple ID → restore backup.
- Find My off or not working? Use Recovery Mode with Finder/iTunes → Restore → set up → sign in → restore backup.
- Recovery Mode failing? Try DFU Mode → Restore → set up → sign in → restore backup.
- Forgot Apple ID? Use iforgot.apple.com to reset.
- Still stuck? Contact Apple Support with proof of purchase.
The Final thoughts
There’s no magic trick, but there is a clear, reliable path. If you own the device and you have your Apple ID, you can unlock your iPhone without the passcode by erasing it through iCloud or Recovery Mode and then restoring your data from backup. Build a strong backup habit now, and this kind of lockout becomes a short-term hiccup—not a disaster.