Travel is easier, cheaper, and far less stressful when your phone just works the minute you land. The single best step is simple: unlock your phone before you fly. An unlocked phone lets you pop in a local SIM card or install a travel eSIM, cut roaming costs, and stay reachable on your terms. In this complete guide, you’ll learn what “unlock” really means, how to check your lock status, the fastest ways to unlock with your carrier, how to set up eSIM for travel, and the exact steps to prepare your device so calls, texts, and data work in any country.
This article is written in clear, friendly language with practical steps you can follow today. It’s also packed with SEO-friendly tips and long-tail phrases people actually search for, like “unlock phone for international travel,” “use local SIM abroad,” “travel eSIM setup,” “keep WhatsApp number when changing SIM,” and “dual-SIM travel tips.”
Key Takeaways
- Unlock first, early. Contact your carrier to request a permanent unlock, confirm eligibility (paid off, time-in-network), and verify the unlock before you fly.
- Pick your connectivity plan. After unlocking, choose a local SIM/eSIM for the lowest cost or use your carrier’s international travel pass for convenience.
- Check compatibility. Make sure your phone supports the destination’s LTE/5G bands and VoLTE so calls, texts, and data work smoothly abroad.
- Prep offline essentials. Download maps, translation packs, boarding passes, and key screenshots; set cloud/media to Wi-Fi only to avoid surprise data use.
- Control costs on the trip. Use airplane mode or disable data on your home line, connect to trusted Wi-Fi (with a VPN for sensitive tasks), and turn off background data for non-essential apps.
What “Unlocking” Means (and Why It Matters)
When a phone is carrier-locked, it only works with SIM cards from that carrier. When a phone is unlocked, it can use any compatible SIM or eSIM from any carrier worldwide. Unlocking has nothing to do with your screen passcode, Face ID, or a SIM PIN. It’s a network permission stored against your device’s IMEI.
Why this matters for travel is simple. If your phone is unlocked, you can:
- Use local SIM or eSIM for low-cost data and calling in the country you’re visiting.
- Avoid bill shock from international roaming.
- Switch carriers on the go if signal is weak or prices are high.
- Run dual lines (home number + local data) on one device if it supports dual-SIM or dual-eSIM.
If your phone is still locked, you’re stuck paying whatever your carrier charges for roaming, or you’ll be hunting for Wi-Fi. Unlocking gives you freedom and control.
How to Check if Your Phone Is Locked
Checking your current lock status takes less than a minute and can be done at home.
iPhone
Open Settings → General → About → look for Carrier Lock.
- If it says No SIM restrictions, your iPhone is unlocked.
- If it mentions a carrier, your phone is likely locked to that network.
Android (Samsung, Google Pixel, others)
There isn’t one single label across all Android brands, but you can use these quick checks:
- Insert a SIM from a different carrier. If you see bars and can place a call, it’s unlocked.
- In Settings, search for Network unlock, SIM status, or Carrier Lock (names vary by brand).
- Contact your carrier’s support chat and ask, “Is my device SIM unlocked?”
Tip: Phones bought outright from the manufacturer (e.g., Apple Store, Google Store, Samsung.com) are often unlocked by default, unless stated otherwise.
📖 Also Read: What Is SIM-Lock? A Beginner’s Guide to Carrier Restrictions
The Easiest Way to Unlock: Ask Your Carrier
For most people, unlocking through your current carrier is the most reliable path. Policies differ by country and company, but they usually include conditions like the device being paid off and active for a certain number of days. In many cases in the U.S., phones are eligible around 60 days after activation if they’re not flagged for fraud or lost. Elsewhere, timelines vary.
Here’s a simple, universal plan:
- Find your IMEI: Dial
*#06#to display your IMEI(s). On eSIM-capable phones you may have IMEI and IMEI2. - Check your account status: Make sure the device is paid off and your account is in good standing.
- Request unlock: Use your carrier’s app, chat support, or unlock portal. Ask for a permanent unlock.
- Complete the process:
- iPhone unlocks usually apply over the air. After approval, insert a different carrier’s SIM or restart and connect to Wi-Fi to fetch the unlock.
- Many Android phones apply unlock either over the air or via a Device Unlock section in Settings (name varies).
- Verify: Insert a SIM from another carrier or install an eSIM. If it registers on the network, you’re unlocked.
If your trip is soon and your carrier says you’re not eligible yet, ask politely if a travel exception is possible. If they say no, you may still have options (see next section), but always try the official path first.
When to Consider a Reputable Third-Party Unlock Service
If your carrier will not unlock in time, some travelers use third-party IMEI-based unlock services. These services ask for your IMEI, your phone model, and the original carrier. The best of them submit requests through legitimate channels and deliver permanent unlocks. The worst of them make promises they can’t keep.
If you choose this route, use caution:
- Research first: Look for long-running services with real reviews and clear refund policies.
- Avoid “instant unlock for any IMEI” claims: That’s a red flag, especially for newer models and certain carriers.
- Pay with a method that supports refunds: In case it does not work.
- Never share one-time codes or Apple ID credentials: An unlock should never require your Apple ID, Google password, or remote access to your phone.
Third-party unlocks can save the day, but the safest and most predictable method will always be unlocking through your carrier.
📖 Also Read: Top 5 Cheap Unlocked Cell Phones You Can Buy Today
eSIM vs. Physical SIM: What’s Best for Travel?
Both options work. The right choice depends on your phone and travel style.
eSIM (digital SIM)
An eSIM is a downloadable SIM profile. You scan a QR code or use an app to install it. Many modern phones (iPhone XR and newer, Google Pixel 4 and newer, most recent Samsung Galaxy S/Note/Flip/Fold models) support eSIM—some support two active eSIMs at once.
Pros
You can buy and install before you fly, switch plans without visiting a store, and keep your home SIM active for calls and banking codes while using data from the travel eSIM.
Cons
Not every carrier in every country supports eSIM. Some eSIMs are data-only (no voice minutes). If you change phones, moving an eSIM can be tricky unless the provider supports easy transfers.
Physical SIM
A physical SIM works everywhere and is easy to swap between phones.
Pros
Available at airports, kiosks, convenience stores, and carrier shops. Often includes voice, SMS, and data. Great when eSIM options are limited.
Cons
You’ll need your phone unlocked. Swapping SIMs means handling a tiny tray and pin. If you remove your home SIM, you may miss calls or texts to your usual number unless you use dual-SIM or set up call forwarding.
Best of both
If your phone supports dual-SIM (any combo of physical + eSIM or dual eSIM), set your home line for calls/SMS and your travel line for data. This is the smoothest way to keep WhatsApp/iMessage working while enjoying local rates.
Step-by-Step: Set Up Dual-SIM for Travel
- Unlock your phone so any SIM/eSIM works.
- Install a travel eSIM before you fly, or buy a local SIM on arrival.
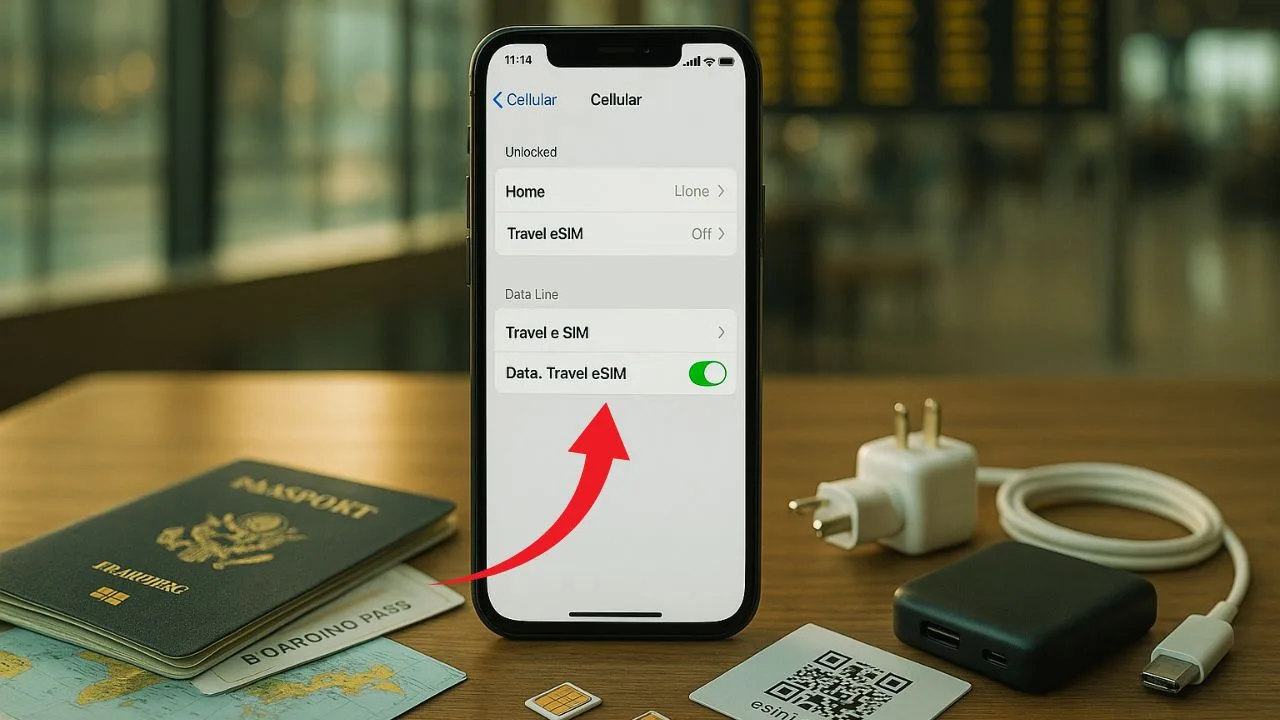
- On iPhone: Settings → Cellular (or Mobile Data)
- Set Default Voice Line to your home SIM if you want to receive calls on your usual number.
- Set Cellular Data to the travel line, and toggle Allow Cellular Data Switching off to keep data strictly on the travel plan.
- On Android (Samsung/Pixel): Settings → Network & Internet → SIMs
- Choose which SIM handles Data, Calls, and SMS.
- Disable data switching to avoid surprise roaming.
- Update your contacts to use + country codes (e.g., +1 for U.S.) so calls and messages format correctly abroad.
- WhatsApp/iMessage: Keep your account tied to your home number. WhatsApp works fine on data from the travel SIM while keeping your original number active in the app.
Compatibility: Will My Phone Work Abroad?
Most modern phones support a wide range of 4G LTE and 5G bands, but coverage still varies. Here’s how to check:
- Find your exact model number (Settings → About Phone).
- Search “[your model] bands” and compare with the main bands used in your destination. Focus on 4G LTE bands first (they carry most of the coverage), then 5G.
- VoLTE and Wi-Fi Calling: In many countries, 3G networks are retired. Voice calls often need VoLTE (Voice over LTE). Make sure VoLTE is enabled and supported by your travel carrier. If not, you may rely on Wi-Fi calling or app-based calls (WhatsApp, FaceTime Audio, Skype).
- Samsung region lock: Older Galaxy models were subject to a “region lock” that required first activation in the original region. Most recent models aren’t affected, but if you bought your phone in one region and never used it there, place a few minutes of local calls on the original region SIM before you leave, just in case.
If in doubt, visit a local carrier shop on arrival. Staff can advise on the best plan for your device and confirm VoLTE/5G compatibility.
📖 Also Read: How to Unlock Samsung Galaxy S23 Ultra for Any Carrier
Roaming vs. Local SIM vs. Travel eSIM: What Costs Less?
- Carrier roaming is the simplest (no setup), but it’s often the most expensive. Some carriers offer daily passes with a flat fee; this can be fine for short trips but adds up on longer stays.
- Local SIM generally gives the lowest price per GB and good local call rates. It’s perfect for stays of a week or more.
- Travel eSIM is the best balance for many people: buy before you fly, turn it on when you land, and pay near-local rates without visiting a shop. Data-only eSIMs are common and work great with WhatsApp/iMessage.
For multi-country trips, look for regional plans that cover several countries in one bundle. If you need voice minutes to call local numbers (hotels, drivers), choose a plan that includes voice or add an app-based calling solution.
Pre-Trip Timeline: Simple, Reliable Prep
Two Weeks Before You Fly
Make your unlock request with your carrier. If you’re already unlocked, you’re ahead. Decide whether you’ll use a local SIM or a travel eSIM. If eSIM, buy now so you can install and test while still at home Wi-Fi.
3–5 Days Before Departure
Back up your phone (iCloud or Google), update your OS, and check for carrier settings updates. Export and save boarding passes and hotel confirmations offline. Download offline maps for your first city so you can navigate without data right away.
24–48 Hours Before Departure
Install the eSIM profile if you chose that route and leave it switched off until you land. Label your lines (e.g., “Home” and “Japan eSIM”) so you don’t get confused later. Set Cellular Data to your travel line, but turn data roaming off on your home line to prevent charges.
At the Airport (Arrival)
Turn on the travel eSIM or insert your local SIM. Restart your phone. If data doesn’t start, check APN settings provided by the carrier or in the eSIM app. Open a browser to confirm connectivity. Send a test WhatsApp message to let family know you’ve arrived.
Avoiding Service Headaches: APN, 5G, and Manual Networks
Sometimes a phone connects but data won’t load. The fix is often one of these:
- APN: The Access Point Name tells the network how to route your data. If the eSIM or SIM doesn’t auto-configure APN, add the APN exactly as your carrier lists it. This is usually in Settings → Cellular/Mobile Data → SIM/Access Point Names.
- Preferred network type: If 5G is weak in your area, switch to LTE/4G for stability.
- Manual network selection: Set Network Selection to manual and pick the strongest carrier if auto-select keeps bouncing between networks.
- Carrier settings: Accept any pop-up that says Carrier Settings Update.
- Roaming guards: Make sure data roaming is on for your travel line and off for your home line.
Keep Your Number for Banking and OTP Codes
Many travelers worry about losing access to bank texts and two-factor codes. You don’t have to.
- Use dual-SIM: Keep your home SIM active for calls/SMS, but disable data on it to avoid roaming charges. Set data to your travel SIM/eSIM.
- Switch to app-based 2FA: Move login codes to an authenticator app (Microsoft Authenticator, Google Authenticator, 1Password, Authy) before you travel. App codes work offline.
- Add backup methods: Set email prompts or security keys as backups in case SMS doesn’t arrive.
- VoIP caution: Some banks block codes to VoIP numbers. If you use a service like Google Voice to keep a U.S. presence, test bank logins in advance so you know which accounts still rely on your mobile carrier line.
Messaging and Apps: Keep Chats on Your Home Number
You can keep your chat identity while using a foreign SIM or travel eSIM.
- WhatsApp stays tied to your original number even when you’re using data from another SIM. Keep your SIMs set so the home line remains your WhatsApp identity while data comes from your travel plan.
- iMessage can send via Apple ID or phone number. In Settings → Messages → Send & Receive, keep your Apple ID and home number selected. If your new SIM tries to register iMessage with its own number, that’s optional—most travelers don’t need it.
- FaceTime works the same way.
- Call forwarding: If you prefer, forward calls from your home number to a VoIP number you can answer on Wi-Fi/data. Check forwarding fees with your carrier first.
Security Basics for Traveling With an Unlocked Phone
An unlocked phone is more flexible, and with smart setup it’s also safe.
- SIM PIN: Add a SIM PIN to stop someone from popping your SIM into another phone and hijacking your number. Store the PUK code in a secure note.
- Strong lock screen: Use Face ID/Touch ID with a backup passcode.
- Backups: Turn on automatic backups. If your phone is lost, you can restore fast.
- Find My: Keep “Find My iPhone” or “Find My Device” on and tested.
- Public Wi-Fi: Avoid sensitive logins on open networks. Use your travel data or a trusted VPN if needed.
- eSIM advantage: eSIMs can’t be physically removed, which can help keep service active if a phone is taken.
Buying a SIM Abroad: Airport, Kiosk, or App?
Each option has trade-offs.
- Airport kiosks are convenient, open late, and staff speak English, but prices can be higher than in the city.
- Carrier shops in town often have better bundles and local advice, but you’ll spend time finding them.
- Travel eSIM apps let you buy and install plans instantly. Many show coverage maps and top-up options inside the app.
For short trips, convenience usually wins. For longer stays, compare bundles. Look for plans that include enough high-speed data for maps, ride-hailing, translation, photos, and a few video calls. If you rely on tethering, make sure hotspot is allowed.
Special Phone Notes (iPhone, Pixel, Samsung)
- iPhone: Newer U.S. models are eSIM-only, which is great for travel eSIMs. You can run dual eSIMs at once on many models. Use Settings → Cellular to label and set defaults.
- Google Pixel: Pixels handle eSIM well and often support dual-SIM dual-standby. Setup is under Settings → Network & Internet.
- Samsung Galaxy: Recent S/Flip/Fold models support eSIM in many regions plus excellent 5G bands. If you bought a phone in one region and use it in another, check eSIM availability for your exact model number.
Battery and Accessory Prep
Travel data uses more battery because the phone negotiates with new networks and switches bands. Bring a small power bank, a USB-C cable, and a world adapter that matches your destination’s plug shape and voltage. Keep your SIM ejector in your wallet or taped inside your phone case.
FAQs
1) Do I need to unlock my phone for international travel?
It’s strongly recommended. An unlocked phone lets you use a local SIM or travel eSIM for cheap data and calls. If your phone stays locked to your home carrier, you’re usually limited to that carrier’s (often pricey) roaming plans and can’t use foreign SIM/eSIM options.
2) How do I prepare my cell phone for international travel?
Two weeks before you fly, request a carrier unlock (or confirm you’re already unlocked). Install a travel eSIM or plan to buy a local SIM on arrival. Back up your phone, update iOS/Android, and accept carrier settings updates. Set your travel line for data and turn data roaming off on your home line. Save boarding passes offline, download offline maps, and move 2FA to an authenticator app so you’re not dependent on SMS abroad.
3) Will an unlocked phone work internationally?
Yes—if the hardware supports the bands used in your destination. Most modern iPhone, Pixel, and Galaxy models cover global LTE and many 5G bands, but coverage still varies by country. Enable VoLTE (many places no longer have 3G for voice), check APN settings, and be ready to switch to LTE if 5G is spotty.
4) Do I need to unlock my phone to use international eSIM?
In most cases, yes. To install and use an eSIM from a different carrier, your phone generally must be unlocked. The main exception is using your own carrier’s roaming eSIM/add-on plan, which will work even if the device is locked—though it won’t save you as much as a local or regional eSIM.
5) Can customs ask you to unlock your phone?
Rules differ by country. At some borders, officers may inspect devices and ask for access; refusing can lead to device detention or, in some places, denied entry. This isn’t legal advice—check official guidance for your destination. A practical tip is to travel with minimal local data on the device, use a strong passcode, and keep “Find My” enabled.
6) What is the best option for a cell phone when traveling internationally?
For most trips, a travel eSIM is the sweet spot: buy before you fly, turn it on when you land, and get near-local rates. For longer stays, a local physical SIM can be the cheapest overall. Carrier roaming passes are the simplest but often the most expensive; they’re fine for short, one- or two-day trips. If your phone supports dual-SIM, keep your home number for calls/SMS and use the travel line for data.