Getting a new iPhone feels exciting—until you reach the “cellular” part and realize there isn’t a classic SIM card to pop in. If you’re setting up an iPhone 17 Pro Max, the good news is: activation is usually fast, and you can do most of it right from the phone in a few minutes.
This guide is written for AT&T, T-Mobile, and Verizon users (and anyone switching carriers). I’ll walk you through the setup in plain language, including the easiest ways to activate eSIM, transfer your number, and fix common issues.
Key Takeaways
- iPhone 17 Pro Max uses eSIM, not a physical SIM card. Activation happens digitally during setup or later through your carrier, so there’s nothing to physically insert in most regions.
- Wi-Fi makes activation faster and smoother. While cellular activation can work without it, a strong Wi-Fi connection helps avoid errors and speeds up eSIM installation.
- AT&T, T-Mobile, and Verizon all support quick eSIM transfers. Most users can move their existing number in minutes using on-screen prompts, a QR code, or the carrier’s app or website.
- Most activation issues are easy to fix. Restarting the phone, checking Cellular settings, or asking the carrier to re-push the eSIM usually resolves “No Service” or setup delays quickly.
eSIM vs Physical SIM: Which Does Your iPhone 17 Pro Max Have?
| Feature | eSIM-Only (US, Canada, etc.) | Hybrid (Europe, UK, etc.) |
|---|---|---|
| Physical SIM Tray | ✗ No | ✓ Yes (nano-SIM) |
| eSIM Support | ✓ Up to 8 stored, 2 active | ✓ Up to 8 stored, 2 active |
| Dual SIM Capability | ✓ Dual eSIM | ✓ eSIM + nano-SIM |
| Available Regions | US, Canada, Japan, Mexico, UAE, Qatar, Oman, Saudi Arabia, Bahrain, Kuwait | Europe, UK, Australia, Asia, Latin America |
| Best For | Digital-first users, easy carrier switching | Travelers needing local SIM flexibility |
Insert a Physical SIM (If Supported)
If you purchased your iPhone 17 Pro Max in Europe, the UK, Australia, or other regions that support physical SIM cards, you’ll have a nano-SIM tray on the left side of your device. Here’s how to properly insert your SIM card.
How to Open the SIM Tray
Locate and safely eject the SIM tray
The SIM tray is located on the left side of your iPhone 17 Pro Max, below the volume buttons. You’ll need the SIM eject tool that came in your iPhone box (or a straightened paperclip).
- Power off your iPhone 17 Pro Max before inserting or removing the SIM card.
- Locate the small pinhole on the left edge of your device.
- Insert the SIM eject tool straight into the hole and press firmly until the tray pops out.
- Gently pull the tray completely out of the device.
Pro tip: If you don’t have the SIM eject tool, a paperclip works perfectly. Just make sure it’s thin enough and don’t use anything that could damage the mechanism.
How to Place the SIM Correctly
Proper orientation is crucial
The iPhone 17 Pro Max uses a nano-SIM card—the smallest standard SIM size. The tray is designed so the card only fits one way.
- Place your nano-SIM card into the tray with the gold contacts facing down and the notched corner aligned with the tray’s corner.
- Make sure the SIM sits flat and doesn’t stick up—it should rest perfectly in the tray’s cutout.
- Carefully slide the tray back into your iPhone, making sure it goes in the same orientation it came out.
- Push the tray until it sits flush with the edge of your iPhone.
- Power on your device and wait for the carrier signal to appear.
Important: Never force the SIM tray. If it doesn’t slide in smoothly, remove it and check that the SIM is properly seated. Forcing it can damage both the tray and your iPhone.
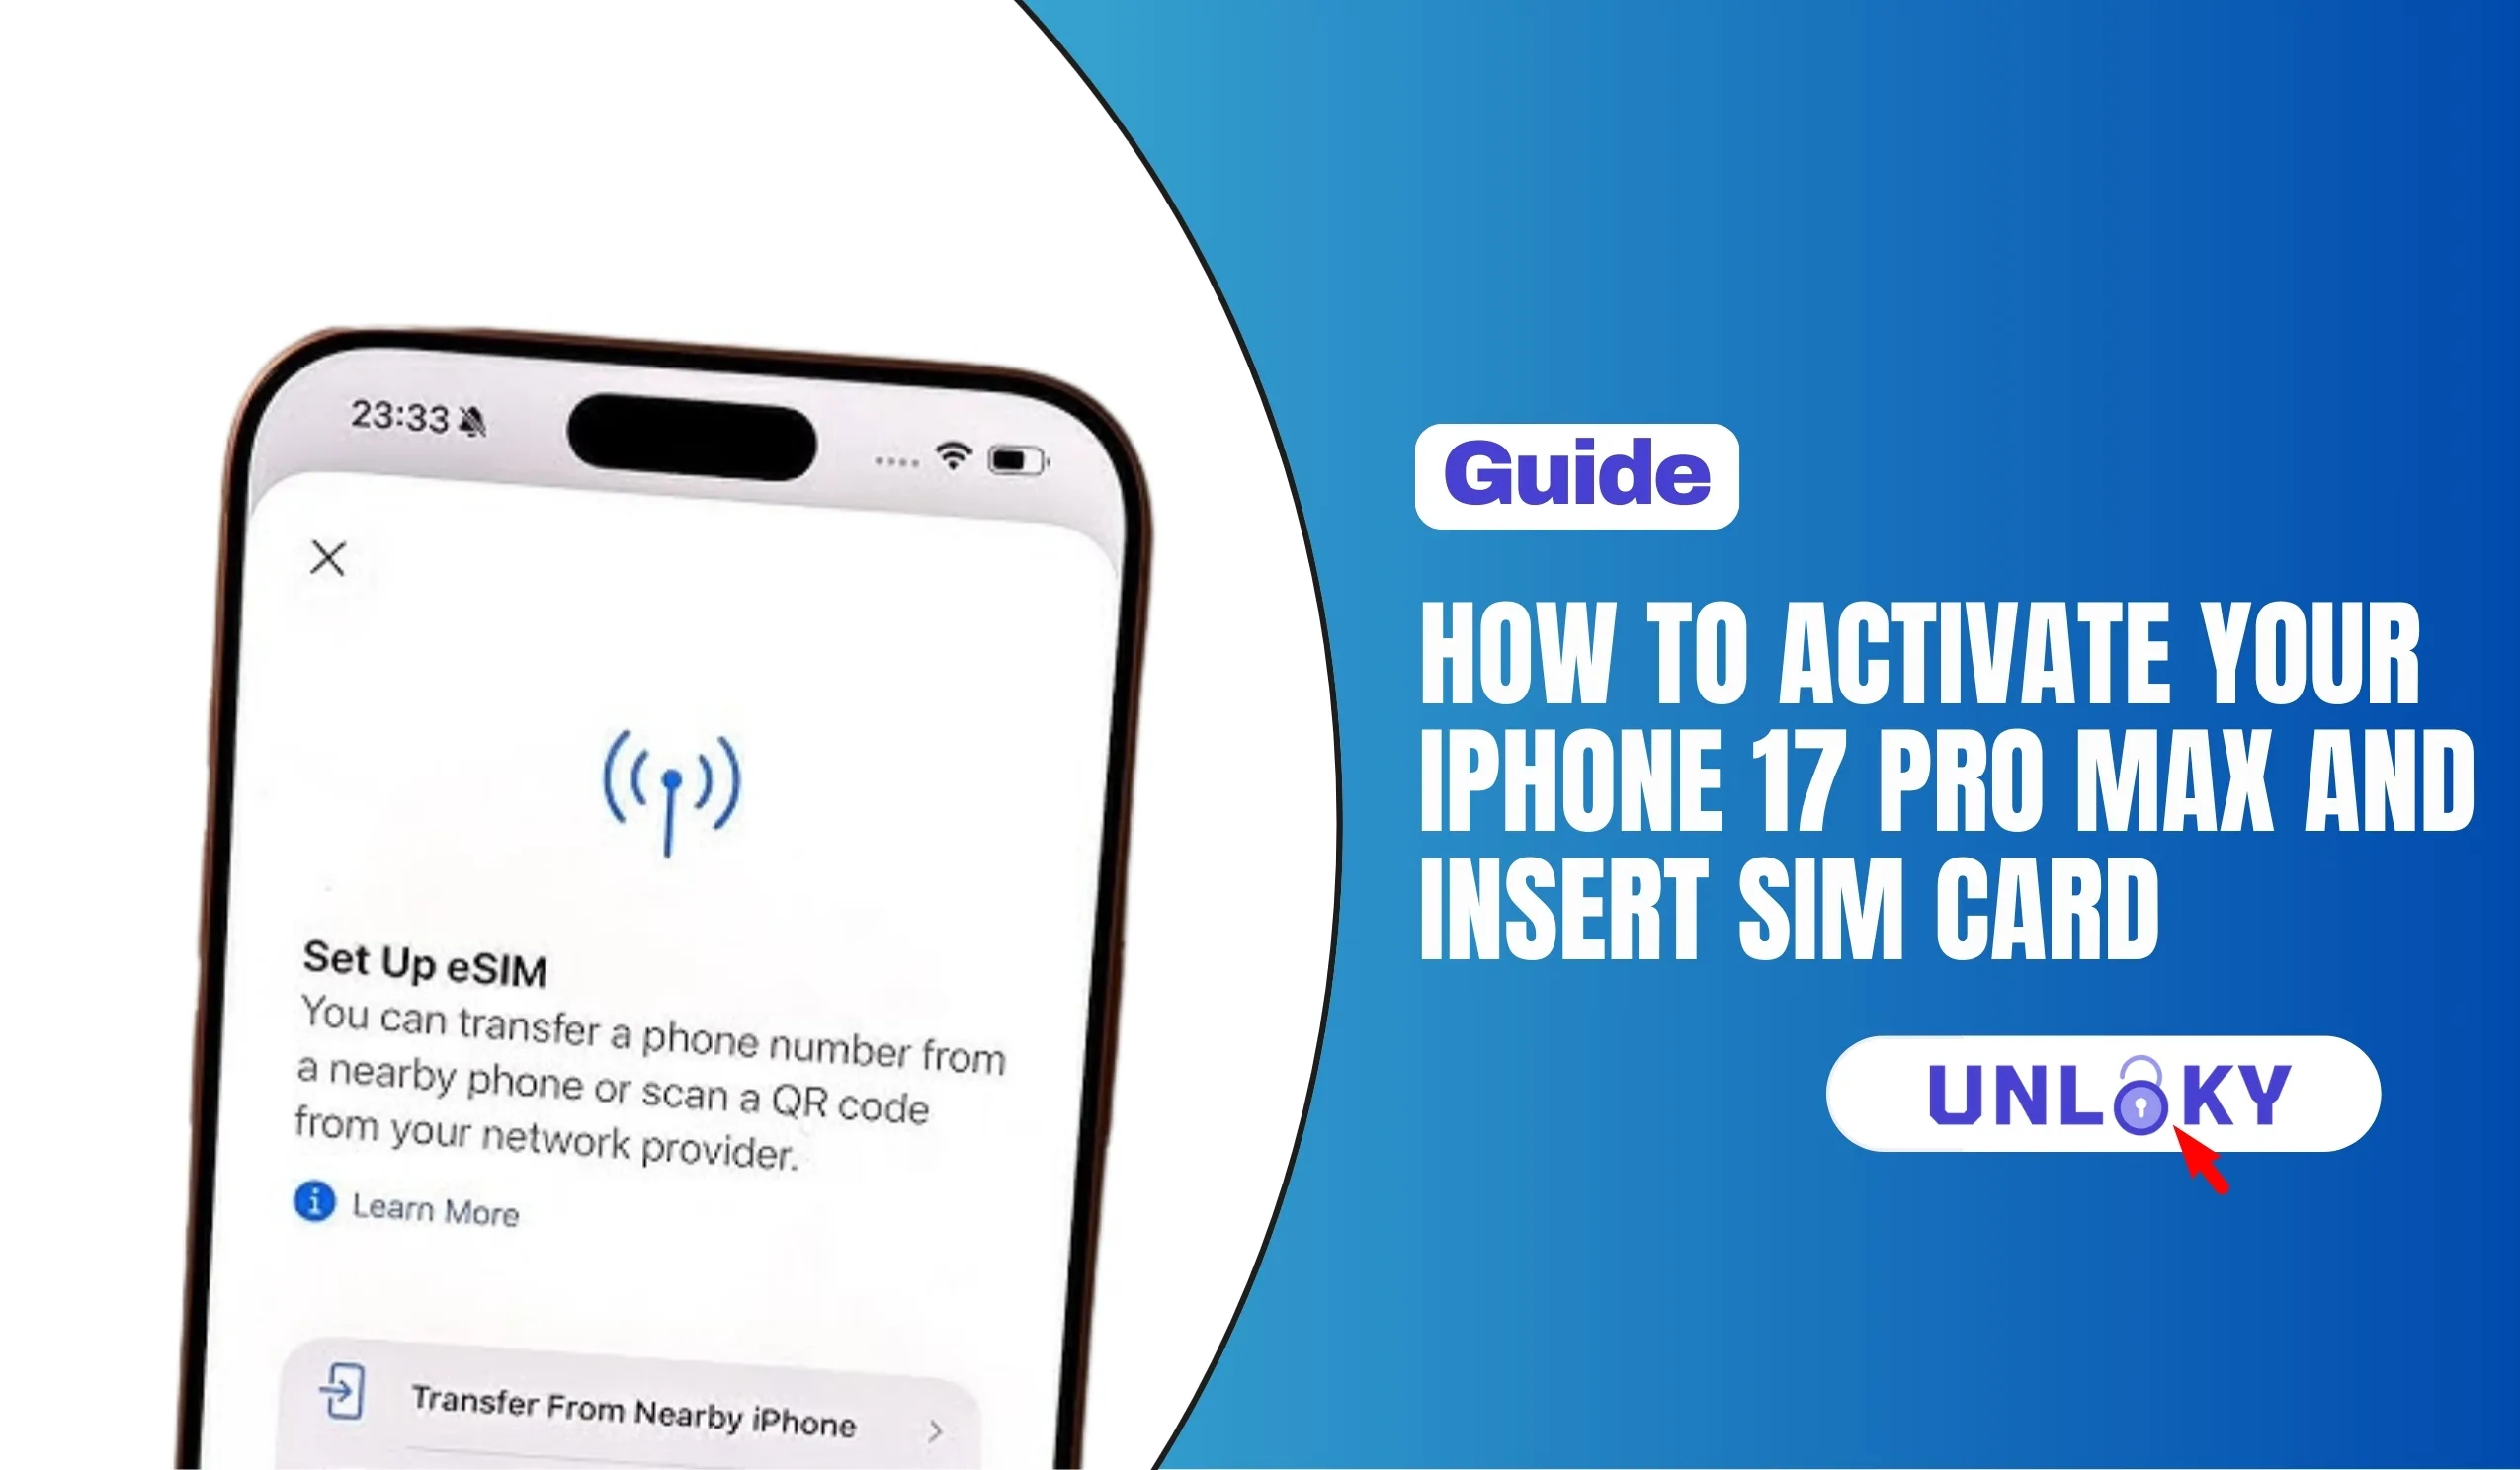
Activate eSIM (Most Common on New iPhones)
For iPhone 17 Pro Max users in the US and other eSIM-only regions, digital SIM activation is your only option—and honestly, it’s faster and more convenient than dealing with physical cards. Here are the three main ways to set up eSIM.
Transfer from Old iPhone (eSIM Quick Transfer)
Fastest method if upgrading from another iPhone
If you’re upgrading from an iPhone 11 or later running iOS 16+, eSIM Quick Transfer lets you move your cellular plan to your new iPhone 17 Pro Max without contacting your carrier. It’s genuinely seamless.
During Initial Setup:
- Turn on your new iPhone 17 Pro Max and place it near your old iPhone.
- Follow the Quick Start prompts to begin setup.
- When you reach the “Set Up Cellular” screen, select “Transfer From Nearby iPhone”.
- On your old iPhone, confirm the transfer when prompted.
- Wait for the eSIM to activate—this usually takes 1-2 minutes.
After Setup:
- Go to Settings → Cellular on your new iPhone.
- Tap “Set Up Cellular” or “Add eSIM”.
- Choose “Transfer From Nearby iPhone”.
- Follow the on-screen instructions on both devices.
Note: Your old iPhone’s SIM will be deactivated once the transfer completes. Make sure you’re ready to switch before confirming.
Scan a QR Code
Most common method for new activations
Your carrier will provide a QR code either in-store, via email, or through their website. This is the most universal method that works with all carriers.
During Initial Setup:
- Connect your iPhone 17 Pro Max to Wi-Fi.
- When the “Set Up Cellular” screen appears, tap “Use QR Code”.
- Point your camera at the QR code from your carrier.
- Tap “Continue” when the cellular plan is detected.
- Enter any confirmation code if required by your carrier.
After Setup:
- Open the Camera app and scan your carrier’s QR code.
- Tap the notification that says “Cellular Plan Detected”.
- Follow the prompts to add and activate the plan.
Alternative (iOS 26+):
If you receive a QR code via email, you can tap and hold the QR code image, then select “Add eSIM” directly—no camera needed.
Carrier App / Assigned eSIM
Let your carrier handle everything
Some carriers can push an eSIM directly to your iPhone or activate it through their official app. This is increasingly common with AT&T, T-Mobile, and Verizon.
Carrier App Method:
- Download your carrier’s app from the App Store (AT&T, T-Mobile, My Verizon, etc.).
- Sign in with your account credentials.
- Look for “Activate eSIM” or “Add a line” option.
- Follow the in-app instructions to complete activation.
Carrier-Assigned eSIM:
- Contact your carrier to request eSIM activation.
- Provide your iPhone’s IMEI and EID numbers (find these in Settings → General → About).
- When the carrier assigns the eSIM, you’ll receive a notification.
- Tap “Finish Setting Up Cellular” to complete activation.
Carrier-Specific Step-by-Step (AT&T, Verizon, T-Mobile)
Below are simple, real-world steps that match how most people activate today.
Activate iPhone 17 Pro Max on AT&T
AT&T makes eSIM activation straightforward, whether you’re a new customer or upgrading your device.
For New AT&T Customers:
- Visit att.com/activatenow or go to an AT&T store.
- Choose a plan and provide your iPhone 17 Pro Max’s IMEI number.
- AT&T will email you a QR code or send activation to your device.
- Scan the QR code or tap the notification to complete setup.
For Existing AT&T Customers (Upgrade):
- During iPhone setup, your eSIM should automatically download when connected to Wi-Fi.
- If prompted, select your phone number and confirm the transfer.
- Wait for the “Cellular Setup Complete” message.
After Device Setup:
- Go to Settings → Cellular → Add eSIM.
- Select “Transfer From Nearby iPhone” or “Use QR Code”.
- Follow prompts to activate your AT&T service.
Need help? Contact AT&T support at 1-800-331-0500 or visit att.com/support
Activate iPhone 17 Pro Max on T-Mobile
T-Mobile’s network works seamlessly with iPhone 17 Pro Max’s eSIM. Here’s how to get connected.
For New T-Mobile Customers:
- Visit t-mobile.com or a T-Mobile store to purchase a plan.
- Request eSIM activation and provide your device’s IMEI and EID.
- T-Mobile will send a QR code via email or the T-Mobile app.
- Scan the QR code during or after iPhone setup.
For Existing T-Mobile Customers:
- During setup, your iPhone will prompt you to install the T-Mobile Cellular Plan.
- Tap the notification and follow the prompts.
- If no prompt appears, go to Settings → Cellular → Set Up Cellular.
Using the T-Mobile App:
- Download the T-Mobile app from the App Store.
- Sign in to your account.
- Navigate to Account → Manage devices.
- Select your iPhone 17 Pro Max and tap “Activate eSIM”.
Transferring from Android:
- On your new iPhone, go to Settings → Cellular → Set Up Cellular.
- Tap “Other Options” then “Transfer from Android”.
- Scan the QR code with your Android device to initiate transfer.
Need help? Contact T-Mobile at 1-800-937-8997 or visit t-mobile.com/support
Activate iPhone 17 Pro Max on Verizon

Verizon’s 5G network and eSIM activation process work great with iPhone 17 Pro Max. Here’s the complete guide.
For New Verizon Customers:
- Visit verizon.com/bring-your-own-device to check compatibility.
- Choose a plan and enter your iPhone’s IMEI number.
- Complete the checkout process—Verizon will assign an eSIM to your device.
- Turn on your iPhone and connect to Wi-Fi to download the eSIM.
For Existing Verizon Customers (Upgrade):
- If you ordered through Verizon, your eSIM is pre-assigned.
- Power on your iPhone 17 Pro Max and connect to Wi-Fi.
- The device will automatically download and activate your eSIM.
- Your old device will be deactivated once the new one activates.
Using My Verizon App:
- Download the My Verizon app from the App Store.
- Sign in to your Verizon account.
- Go to Devices → Manage.
- Select “Activate or switch device” and follow the prompts.
Dual SIM Setup:
- After your primary eSIM is active, go to Settings → Cellular.
- Tap “Add eSIM” to add a second line.
- Follow prompts to scan QR code or transfer from another device.
- Configure which line to use for calls, messages, and data.
Need help? Contact Verizon at 1-800-922-0204 or visit verizon.com/support
Troubleshooting: Common Activation Problems (Easy Fixes)
Problem: “No Service” or “SOS Only”
Try this in order:
- Make sure Wi-Fi is connected.
- Restart the iPhone.
- Go to Settings → Cellular and see if the plan is installed.
- Toggle Airplane Mode on for 10 seconds, then off.
- Go to Settings → General → About and wait 30 seconds (carrier updates sometimes pop up).
If it still won’t activate, your carrier may need to re-push the eSIM.
Problem: You skipped cellular setup and now you can’t find it
Go to Settings → Cellular → Add eSIM and follow the prompts.
Problem: eSIM installed, but iMessage sends from email instead of your number
This can happen if you activate eSIM after setup on some iOS versions. A common fix is:
- Settings → Messages
- Toggle iMessage OFF, wait a few seconds, then toggle it ON
- Check Send & Receive and select your phone number
(If it persists, restarting the phone and checking date/time set automatically can help too.)
Problem: You’re switching carriers and activation is taking a long time
Number transfers can take from minutes to longer depending on the old carrier and whether details match perfectly. If it’s stuck:
- Double-check the account number and transfer PIN with the old carrier.
- Make sure the old line is still active until the port completes.
It depends on where you bought it. iPhone 17 Pro Max models sold in the US, Canada, Japan, Mexico, and several Middle Eastern countries are eSIM-only with no physical SIM tray. Models sold in Europe, UK, Australia, and most other regions include both a nano-SIM tray and eSIM support.
iPhone 17 Pro Max can store up to 8 eSIMs and have 2 active simultaneously. This is perfect for separating work and personal lines, or keeping a local data eSIM for travel while maintaining your primary number.
Yes! Most major carriers (AT&T, T-Mobile, Verizon) support converting physical SIM cards to eSIM. You can do this through the carrier’s app, by scanning a QR code they provide, or using eSIM Quick Transfer if your old phone supports it. Contact your carrier for specific instructions.
First, make sure you have a stable Wi-Fi connection—eSIM activation requires internet. Try restarting your iPhone, then go to Settings → Cellular → Add eSIM and try again. If issues persist, contact your carrier directly as there may be an account-level issue. You can also try resetting network settings (Settings → General → Transfer or Reset iPhone → Reset → Reset Network Settings).
Absolutely. iPhone 17 Pro Max is a world phone that works on networks globally. For international travel, you can add a local eSIM from providers like Airalo, Holafly, or Nomad while keeping your primary line for calls and texts. Just go to Settings → Cellular → Add eSIM before or during your trip.
Go to Settings → General → About and scroll down to find your IMEI and EID. You’ll need these numbers when activating eSIM through your carrier. You can also find the IMEI on the original box or by dialing *#06# on your iPhone.
Once you complete an eSIM Quick Transfer, your old phone’s cellular service is automatically deactivated. Your phone number and plan move to your new iPhone 17 Pro Max. Your old device will only work on Wi-Fi until you add a new cellular plan to it.
The information in this guide is provided for educational purposes and reflects procedures as of January 2026. Carrier policies, pricing, and activation methods may change without notice. Always verify current procedures with your specific carrier (AT&T, T-Mobile, or Verizon) before making changes to your cellular service. iPhone, iOS, and eSIM features may vary by region. Apple, iPhone, and iOS are trademarks of Apple Inc.